Thursday, April 25, 2013

and away we go

Our house is a whirlwind of suitcases and piles to be packed and lists right now.  I must have seven lists going, simultaneously.  I can't really say if that is helping or hindering my trip preparation process. 

Yesterday felt like at least three days rolled together.  6:30pm found me finishing up a round of bow ties and Steve still at work.  9:00pm found us at Walmart, trying to buy another inflatable travel pillow.  10:00pm found us rearranging our bedroom furniture to accommodate a crib. 
 
Today has been no less exciting.  We started off  with an awesome business meeting and can't wait to get on the plane to have time to discuss some ideas.  We've run errands and mowed the lawn and I am jiggling my leg impatiently as if that will somehow make the washer and dryer produce clean clothing at a faster rate.  I'll let you know how it goes. 

By this time tomorrow, whatever didn't get done will have to stay undone and I find that kind of comforting.  I'll try to pop in for an update once we're back and settled in.  Oh!  And if you want to eat anything delicious in our honor this week, try these Mexican Stuffed Sweet Potatoes- we've been eating them for three days straight and they are amazing! 

Tuesday, April 23, 2013

Ikea Trofast Bookcase Hack


If you remember my budget from the dresser, I had $153.01 left to spend on a bookcase.  I wanted something low, so it won't topple over, and it needed to fit in a very specific spot between the chair and the door. 
 
After searching for a used bookcase in that price range that was solid wood and coming up with nothing, I finally broke down and went to Ikea.  You can imagine how desperate I was if I ended up at Ikea.
 
 
But Star went with me and she is like my Ikea good luck charm- everything went our way.  We bought two Trofast shelf frames for $49.99 each and three packs of shelves for $12.99 each (2 shelves per pack).  I really only needed two packs, but we decided that $12.99 was a small price to pay as insurance against not having to go back if I wanted more shelves. 
 
Ikea total: $138.95
 
I painted the shelves with the yellow milk paint so that they match the dresser.  They were, for some reason, much easier to paint than the dresser and I knocked out that part in a day. 
 
Steve and I decided that we'd rather the shelves have backs than not and I thought that they would look awesome covered with some cool wallpaper.  But then I started shopping for wall paper and realized that even one small roll was going to cost at least $25.  So I swapped out the wallpaper idea for fabric (always saves the day!) and bought 1 1/2 yards of a print that I liked for $10.50. 
 
Then I went to Lowe's and bought a 4' x 4' piece of birch plywood for $14.  I had them cut the two backing pieces for me right there at the store.  Did you know that they'll do that?  Those Lowe's employees- so helpful. 
 
 
I cut the fabric to fit around the backing with about 2" of overhang.  My original plan was to staple the fabric on with a staple gun and then nail the backs to the shelves.  The plywood was too thin for this plan and the staples went all the way through, so I ended up pulling most of them out.  For the second shelf, I was wiser and just lined up the fabric with the back, pulled it tight around the sides, and set it carefully on the back of the book shelf.  Then I hammered in a bunch of tiny finishing nails to hold both the fabric and the back in place. 
 
 
I really like that the shelves are adjustable and also that there are two book cases instead of one.  I was hoping for one larger piece, but I like the fact that I could separate these two into different rooms if I needed to. 
 
My total for the dresser and bookshelves was $310.44.  I gave myself a little grace on going over by $10 since I had purchased the extra "just in case" shelves.  All in all, I am thrilled, especially since one of the first bookshelves we looked at was $276 unfinished! 
 
So that's it- I won't bore you any longer with tales of extreme nesting.  Today, I'm finishing up a few final bow ties before our trip and finalizing my packing list.  I'll stop in before we leave to say goodbye!

Monday, April 22, 2013

two week room


I'm a project person, by nature.  Steve and I both are, actually.  We have different methods and strengths, but we both love a good project. 
 
So it comes as no surprise that I would want to do a ton of projects to prepare a room for our first child.  I could have worked on that room for months, easily.  But due to the uncertain nature of adoption and my own super-cautious nature, I couldn't bring myself to start on much of anything months ago. 
 
 
So I started about two weeks ago.  You know- around the same time we were buying luggage and shopping for plane tickets, because it seemed pretty certain at that point that we'd be getting a child.  Any sane person, knowing they were leaving the country in three weeks, would have bought some furniture and curtains and things for the walls and called it a day.  I kind of toyed with the idea of doing that. 
 
 
But then I accidentally had some coffee late one afternoon and spent the entire night with my mind racing as I tried to sleep.  I thought up project after project that I really really really wanted to do.  Really.   
 
In the morning, when I was thinking more clearly, I told myself that I should pick a couple projects out of the seven or eight I'd thought up and just focus on those.  But even as I told myself that, I also knew that wasn't what I was going to do.  I was going to do every last one of them. 
 
 
Some things, like the curtains and the fabric bunting and the framed book pages, took just a few hours.  Others, like refinishing the dresser, bookshelves, and wall shelf, took days. 
 
If I had more time this week, I'd love to give you detailed instructions for each project.  But I need to pack and clean the house and do other responsible things, so I think I'll just have time to go into serious detail on the bookshelves.  
 
 
One thing that I am especially excited about though and just have to share is the re-upholstery I did on the chair.  This chair has been in my family since before I was born, I think, and has been mine since I was in high school.  My parents even let me get it re-upholstered at that point and I picked a sensible navy blue.  I have never regretted that decision. 
 
But once we put it in the room, I felt like the navy combined with the dark wood was just too dark.  I wanted to make new covers for the cushions, but needed to keep it both cheap and very child friendly.  So I bought a 6' x 9' canvas drop cloth from Lowe's and was able to cover both cushions with plenty left over!  I love the color of the canvas, it's plenty sturdy, and super washable.  Depending on how messy this kid is, I may end up doing something similar to our sofa cushions. 
 
Here is a quick list of everything I made/updated and a few sources:
 
Curtain: made with fabric scraps cut into 6" wide strips and sewn together
Bunting: same fabric scraps, cut into triangles and sewn together
Wall Art: pages cut from one of my childhood books, put in white frames we already had (Target), purchased charcoal mats at Michael's for $2.99 each
 
 
Mirror: used unframed mirror we already owned (Lowe's).  Bought two 1' square sheets of small white tiles for $2.55 each and one tube of silicone adhesive for $3.48 (Lowe's). 
 
 
Wall Shelf: used wooden shelf we already owned.  Used leftover milk paint and stain from dresser project.  Bought two pieces of scrapbook paper for $.12 each (Michael's), cut to fit, and attached with spray adhesive. 
Chair: used chair we already owned.  Covered cushions with $13 canvas drop cloth (Lowe's)
 
 
Dresser: see this post
Bookshelves: more details coming later this week
 
 
What have we learned here?  Mainly that I am a force to be reckoned with when I set my mind to something.  And possibly that I have trouble showing restraint when it comes to home décor projects. 
 
I'll be back later this week with more details on the bookshelves- they were an Ikea hack that I'm particularly proud of!

Friday, April 19, 2013

Plan A


Steve and I became parents this week.  It was fairly quiet, as far as entrances to parenthood go.  We received an email informing us of the joyous, long-awaited, news. 

I called Steve at work.  "So, I guess this means we're parents now," I said. 

"Oh yeah...congratulations!" he said, sounding surprised. 

I dare you to come up with a less exciting intro to parenthood story. 

 
But for us, it was very exciting.  We've been working to complete an international adoption for longer than I care to think about and we have almost made it to the finish line.  This time next week, we'll be on an insanely long plane flight, on our way to a pair of chubby cheeks that I can't wait to squeeze.  I can't wait for so many things about getting to know our son. 

 
I can't wait to tell him all the stories about the crazy past three years we've spent, trying to get to him.  I can't wait to tell him about how we rushed out to buy a fire extinguisher so we'd pass our home study; how we spent an afternoon at the Secretary of State's office, whispering in the lobby about different ways to alter legal documents; how we sped around town to three different banks, trying to find a notary that would sign our paperwork before 5pm and how we treated ourselves with ice cream when we managed to do it. 

 
But mostly, I can't wait to tell him about how much we wanted to adopt.  We've dreamed of adopting a child since before we were married.  I know that's not how it is for some people.  I know that for some people, adoption is a sort of last resort.  Everyone who adopts comes to the decision in a different way and I don't actually think that there is a wrong way to get there.  I mean, orphans need families, right?

But for us, adoption was never Plan B.  The process has been long and rocky and not at all what we expected and we would choose to do it all over again.   And it's not because we're "good people" or any of those other things that people tend to say when they hear we're adopting.  It's because we love children, because we want a family, because there are so many children in this world who need both love and a family.  It's that simple. 


Understandably, I'll be taking a bit of a break from blogging.  And sewing, and shipping, and probably a few things I'd rather not give up, like sleeping and washing my hair.  I have a few posts scheduled for next week with some pictures of the bedroom I've been working on for our little guy.  The dresser, the bookshelves, and many of my other projects from the past two weeks have all been for him and I'm so excited about how his room is turning out. 

I hope your weekend is wonderful.  We'll be packing and enjoying our last bit of time as a family of two!

Wednesday, April 17, 2013

dresser redo and the skinny on milk paint


Have I ever told you that I love to refinish old furniture?  I sure don't do it that often anymore, but I used to drag home all sorts of weird pieces when I was in high school and then paint them and put them in my room.  One dreamy year, my family had a three car garage and we didn't park a single car in it, so I considered that my personal workshop.  I brought home a lot of furniture that year. 
 
 
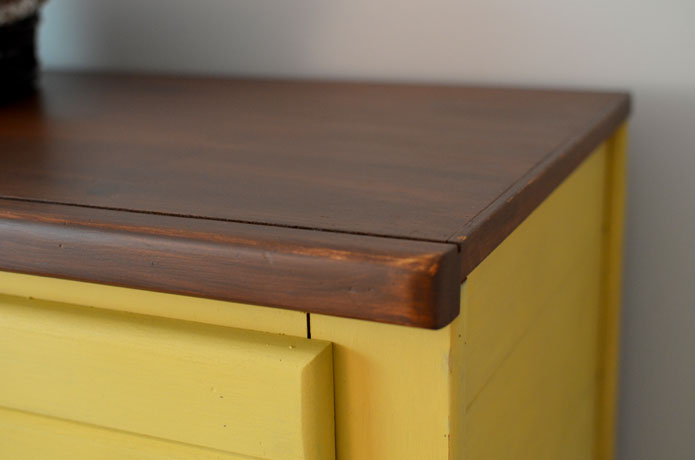
So when the chance came and we needed another dresser but did not want to spend much money on it, I knew that I could put my old skills to use once again.  Steve and I picked up this dresser from Bargain House for $95.  We weren't crazy about the stain color.  Or the weird decorative strip of wood between drawers two and three.  Or the whole general look of it. 
 
But we were crazy about the price and in a time crunch, so we squished it in our trunk and brought it home. 
 
To be clear, only half of it fit in the trunk.  The other half hung out of the back of the car and made me very nervous the whole drive home. 
 
Next, Star and I picked up some milk paint from Great Walls Supply for $22.  I chose Miss Mustard Seed's milk paint in Mustard Seed Yellow.  Milk paint is a very old type of paint that is actually a powdered pigment that you mix with water.  The staff at Great Walls were very helpful and gave us lots of tips for mixing and applying the paint.  I also brought home a bottle of hemp oil ($12) and a half bottle of bonding agent (free- they were out, so they gave me half a bottle that they were using at the store).  The hemp oil is like a top coat that you rub on after you paint the piece.  The bonding agent gets mixed in with the first coat of paint to help it adhere to whatever you're painting on- in my case, previously finished wood. 
 
After searching Pinterest for some inspiration, I felt ready to begin.  I started by gently sanding the top of the dresser.  Then I found an almost empty can of stain in the garage and painted it on pretty thick.  I didn't worry too much about it looking gloppy because I knew I could sand the glops later. 
 
Before I started painting, I pried the strange wooden beam off the middle of the dresser and patched the holes. 
 
 I mixed up my first coat of paint with the bonding agent and started painting the rest of the dresser and drawers.  With milk paint, you don't have to pre-sand anything, which is awesome.  The easiest way I found to mix the paint is by putting the powder and warm water in a glass jar and shaking it for a few minutes.  Then you want to let it sit for a few minutes to settle.  Then stir in the bonding agent last and start painting. 
 
Milk paint, in my experience, can look pretty terrible going on.  The first coat was quite streaky and not at all pretty.  The second coat (without bonding agent) got better.  I think I also got better and mixing the correct ratio of powder and water with each coat. 
 
After I was done painting all the yellow, I decided I wanted a design in the bare spot left between drawers two and three.  Keep in mind that I was determined to: a) only use supplies I had on hand, and b) spend as little time as possible.  I marked some dots with a ruler and taped off a grid of diamonds with masking tape.  Then I took some white craft paint and gently brushed it on.  It was more like dry brushing than painting, so I didn't really have to wait for it to dry.  I took the tape off and then lightly sanded over my diamonds to make them blend into the rest of the piece better. 
 
Once I felt happy with the paint, I went back and sanded any drips or weird spots.  After I was done sanding, I rubbed two coats of hemp oil into the whole thing (top included) to give it a nice shine.  The hemp oil soaks in, so it's not very shiny, but it gives the piece a smoother look and feel that I like.  Also it helps protect the paint. 
 
The last thing to take care of were the knobs.  I found a pack of 10 rubbed bronze knobs at Target for $17.99 that were almost exactly what I was looking for.  The screws that came with them were way too short, but thankfully I'd saved the old screws, which were a little too long, but thankfully Steve had some washers that we added and then they fit just right.  Whew. 
 
My budget for this dresser, plus the bookshelves I'm working on this week, was $300 total.  The dresser ended up costing $146.99, plus I had enough paint left over for the shelves.  I'll share pictures of those next week once they're done!
 
My final thoughts on milk paint:
- it doesn't produce a very even finish, which can be good for used furniture- more forgiving
- getting the right ratio of powder to water takes a few tries and will vary based on what type of surface you are painting
- it is easy to clean up and doesn't have any fumes, which is really pleasant
 
Overall, I thought it was a great paint for this project and I would definitely use it again!

Monday, April 15, 2013

bow ties make me want to have another wedding

It's wild around here, people.  Wild, I tell you. 
 
We had (another) big weekend.  I stitched bow ties until my fingers were sore on Friday night while we caught up on shows on Hulu.  Then I finished the ties on Saturday in the waiting room of Tire Kingdom.  I don't want to brag, but I'm pretty sure I'm the only person who has ever stitched bow ties in the waiting room of Tire Kingdom.  At least that's what I'm assuming based on the looks I was getting. 
 
Some of these ties, specifically the seersucker, (oh!  the seersucker!) make me wish I was planning our wedding again so that I could incorporate them.  I may have to settle for an anniversary party where I force the guests to wear bow ties.  I'll keep you posted. 

We finished painting the dresser and have let it come in the house for good.  I think I have enough milk paint left to do some small book shelves, so you know where to find me this week.  I am working on a full dresser write-up to share pictures, thoughts on working with milk paint, and other little details. 

I'm posting bow ties in the shop all day today and I can hardly believe we got all the pictures done.  Our photo shoot was a whirlwind of lamps and tripods and me pinning Steve's shirt in the back so it looked just right, just like he was a mannequin.  I'm crazy about these plaid bow ties because the colors of the plaid are quite different from one side to the other, making it basically two different ties.  I'd like to say that I planned it that way, but the truth is that it was strictly luck. 
 
Also lucky: finding a husband who is willing to pose in eight different bow ties on a Sunday afternoon.  What can I say?  I'm a lucky girl. 

Friday, April 12, 2013

milk paint: the first attempt

Happy Friday, friends!  I hope it's as beautiful where you are as it is here!
 
I've gotten to spend the better part of the day semi-outside and have loved it.  I'm refinishing this dresser that we picked up at a thrift store last weekend, so I've been in the garage with the door open. 

I think I underestimated how long this project will take and am glad to have Steve's help over the weekend to knock out some more of it.  I'm using milk paint for the first time ever and there is a bit of a learning curve, but I can't wait to tell you all about it once I'm done. 

In addition to refinishing furniture this weekend, we're also having another bow tie photo shoot, rearranging our guest room, and (hopefully!) spending time in our lounge chairs.  I hope that your weekend feels extra long!

Wednesday, April 10, 2013

if there's a tree at the door, let it in

These days, it seems like there is always a tree at the door.  I'm not complaining, because I'd choose a tree over a sales person any day. 

It started a couple of weeks ago when we bought this hibiscus tree for my grandparents.  To make sure it got enough sunlight, we put it in front of the glass storm door every morning.  I would walk by the front hall about ten times a day and see it out of the corner of my eye and think, "Oh!  There's someone at the door," only to realize it was just a tree. 
 
We drove up to Virginia and delivered the tree, only to receive an orange tree as a gift from Steve's family while we were there.  An orange tree!  We've always wanted an orange tree.  Have you ever smelled orange blossoms?  They smell like honeysuckle and candy and heaven.  Seriously. 
 
It's too cool at night still for the orange tree to live outside though, so it sits by the back door all night, patiently waiting to be let out each morning.  It's like a dog, only way better. 
 
Today, the orange tree and I are both going to enjoy some time on the patio- it's way too beautiful to stay inside!
 

Monday, April 08, 2013

seasonal furniture arrangements

Good morning, friends!  Did you have a warm weekend?  The weather here was quite nearly perfect and it finally felt like it might be spring. 
 
As a result of all the warmth, I got bold and packed away our down comforter.  Only time will tell if that was a wise move. 
 
We also moved the furniture in our family room to its warm weather arrangement.  The above picture is what it looks like right now.  Have I ever told you about how we switch our furniture around with the seasons? 
 
When I think about a smart design for any room, the two most important things are seating and focal points.  We move the seating elements in our family room at two different times in the year in order to enjoy different focal points. 
 
One move happens in early December when we decorate for Christmas.  Obviously, we want to be able to look at the tree.  And the fireplace.  So we place the tree next to the fireplace and place the large sofa directly facing these two things.  The love seat goes on the wall next to the tree so that the two sofas form an "L" shape. 
 
This is another view of the winter arrangement.  After the tree comes down, we still want to be able to see the fireplace and the TV.  We watch more movies in the winter than in the warmer months.  Having the larger seating piece facing the things we most want to be looking at means that we're never craning our neck for a better view. 
 
In the winter, I don't worry so much about seeing out the windows.  There are no leaves on the trees, so we can see into several neighbor's yards.  The grass is not very green.  There are no flowers to enjoy. 
 
 
But once spring is here, we move the large sofa so that it faces the wall of windows.  That way, we can enjoy the pear trees in bloom and all the other lovely blooms.  We place the love seat facing the sofa, which is great for conversation.  I also think we have more visitors in the warm months, so it makes sense for us to have the furniture placed for optimal socialization. 

As you can see from this picture of our Kentucky Derby party last year, the warm weather arrangement is not ideal for TV watching.  But, as we don't watch TV very often, it's not usually a problem. 

Right now, the family room is the only room in the house that we regularly move the furniture in, but I wish we could do it in more rooms!  I think it's so much fun to have a change around the house and not get stuck in a rut with how things are arranged. 

Mondays always make me feel optimistic about accomplishing everything on my list for the week- I'm off now to get started!

LinkWithin

Related Posts Plugin for WordPress, Blogger...
Pin It button on image hover